Django User Profile
Free Django samples that allows registered users to edit their profile outside of the admin module.
Django Sample project that allows registered users to edit their profile outside of the admin module. Django User Profile is provided on top of Django Volt.
Features:
- UI Kit: Volt Bootstrap 5 by Themesberg
- UI-Ready App, SQLite Database, Django Native ORM
- Session-Based Authentication, Forms validation
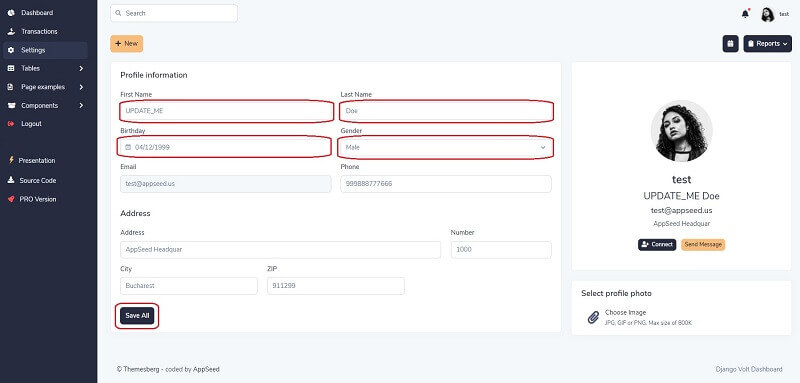
- Editable user profile: Name, Surname, Email, Phone, and address
- User Profile Page:
settings.html
Links
- Django User Profile - LIVE deployment
- Django User Profile - Sample Source Code
- Support via Github (issues tracker) and LIVE on Discord.
How to use the app
To compile and execute the project in a local environment the workstation must have a few software tools already installed:
- GIT - command line versioning tool used to clone the sources
- Python3 - the language used to code the project
Check GIT is installed
$ git -v
git version 2.28.0.windows.1 <-- All Good
Check Python is installed
python --version
Python 3.8.4 <-- All Good
Once we have this minimal toolchain properly installed and accessible via a terminal window we can move forward and compile the code.
Step #1 - Clone/download sources from the public repository
$ git clone https://github.com/app-generator/django-user-profile.git
$ cd django-user-profile
Step #2 - Install modules using a Virtual Environment
$ virtualenv env
$ source env/bin/activate
$
$ pip3 install -r requirements.txt
Step #3 - Create SQLite Database and tables
$ python manage.py makemigrations
$ python manage.py migrate
Codebase Structure
< PROJECT ROOT >
   |
   |-- core/              # Implements app logic and serve the static assets
   |    |-- settings.py   # Django app bootstrapper
   |    |-- static/
   |    |-- templates/    # Templates used to render pages
   |
   |-- authentication/    # Handles auth routes (login and register)
   |    |-- urls.py       # Define authentication routes
   |    |-- forms.py      # Define auth forms
   |
   |-- app/               # A simple app that serve HTML files
   |    |-- views.py      # Serve HTML pages for authenticated users
   |    |-- urls.py       # Define some super simple routes
   |
   |-- customers/         # Handles the profile edit     <-------- NEW
   |    |-- __init__.py   # Defines App init             <-------- NEW
   |    |-- admin.py      # Defines App admin            <-------- NEW
   |    |-- apps.py       # Defines App apps             <-------- NEW
   |    |-- forms.py      # Defines App forms            <-------- NEW
   |    |-- models.py     # Defines App models           <-------- NEW
   |    |-- signals.py    # Defines App signals          <-------- NEW
   |    |-- tests.py      # Defines App tests            <-------- NEW
   |    |-- urls.py       # Defines App routes           <-------- NEW
   |    |-- views.py      # Defines App views            <-------- NEW
   |
   |-- requirements.txt   # Development modules - SQLite storage
   |-- .env               # Inject Configuration via Environment
   |-- manage.py          # Start the app - Django default start script
   |
   |-- ***********************************
The bootstrap flow
- Django bootstrapper
manage.pyusescore/settings.pyas the main configuration file core/settings.pyloads the app magic from.envfile- Redirect the guest users to Login page
- Unlock the pages served by app node for authenticated users
User Profile Feature
This section describes the coding process for this feature that allows authenticated users to update their profiles. By accessing the settings.html page, registered users can update their own profile: name, surname, phone number, city name, ZIP code, ..etc.
The customers app:
This module will manage the user profile information by defining a new model, form, and view. Authenticated users can also upload their avatar.
The Profile model:
customers/models.py:
class Profile(models.Model):

    # Managed fields
    user     = models.OneToOneField(User, related_name="profile", on_delete=models.CASCADE)
    avatar   = models.ImageField(upload_to="customers/profiles/avatars/", null=True, blank=True)
    birthday = models.DateField(null=True, blank=True)
    gender   = models.PositiveSmallIntegerField(choices=GENDER_CHOICES, null=True, blank=True)
    phone    = models.CharField(max_length=32, null=True, blank=True)
    address  = models.CharField(max_length=255, null=True, blank=True)
    number   = models.CharField(max_length=32, null=True, blank=True)
    city     = models.CharField(max_length=50, null=True, blank=True)
    zip      = models.CharField(max_length=30, null=True, blank=True)
The Profile form
Create a related form to show inputs & store data. The ProfileForm will be defined in the customers/forms.py using a definition as below:
from django import forms
from customers.models import Profile

class ProfileForm(forms.ModelForm):
    first_name = forms.CharField(max_length=255)
    last_name = forms.CharField(max_length=255)
    email = forms.EmailField()

    class Meta:
        model = Profile
        fields = '__all__'
        exclude = ['user']
The Profile routing
Activate the routing for customers app by edit the customers/urls.py file with the following code:
from django.urls import path
from customers import views

urlpatterns = [
    path('profile/', views.ProfileView.as_view(), name='profile'),
]
Update core/urls to include customers urls:
from django.conf import settings
from django.contrib import admin
from django.conf.urls.static import static
from django.urls import path, include

urlpatterns = [
    path('admin/', admin.site.urls),  # Django admin route
    path('customers/', include("customers.urls")),  # Django customers route
    # ...
]

# to support and show media & static files in developer mode
if settings.DEVEL:
    urlpatterns += static(settings.MEDIA_URL, document_root=settings.MEDIA_ROOT)
    urlpatterns += static(settings.STATIC_URL, document_root=settings.STATIC_ROOT)
Links & Resources
- Django - official website
- More Django Dashboards provided by AppSeed